BLOG TITLE photo dotFWF_zpsbc04b97d.pngBLOG TITLE photo dotFWF_zpsbc04b97d.pngBLOG TITLE photo dotFWF_zpsbc04b97d.pngBLOG TITLE photo dotFWF_zpsbc04b97d.pngBLOG TITLE

Saturday, December 31, 2011

Baby Ruth Pudding Cookies

Happy New Year, friends!! Can you believe yet another year has flown by? My parents and little brother are here visiting us for the weekend; fireworks have already made a lovely showing and BBQ has been inhaled. Life is good. If you want to make your tummy happy as you ring in the new year, this would be the perfect way to achieve stomach-bliss. Of all the millions (maybe trillions) of cookies I've made, these are by far the best. Seriously. Soft, chewy, chocolatey, perfect. I found this recipe here on Chef in Training.

Ingredients:
1 1/2 sticks (or 3/4 cup) butter
3/4 cup brown sugar
1/4 cup sugar
1 (3.4 oz) package instant vanilla pudding
2 eggs
1 tsp vanilla
1 tsp baking soda
2-1/4 cups flour
1-2 cups chopped Baby Ruth bars

Directions:
Preheat oven to 350 F.
Stir together flour and baking soda and set aside.
In a large bowl, cream butter and sugars together.
Add in pudding package and beat until well blended.
Add eggs and vanilla.
Add flour mixture slowly until well incorporated.
Chop Baby Ruth bars into small pieces (I cut each fun-size bar into four pieces)
Add Baby Ruth pieces (or whatever add-in you choose)
Roll into 1" balls and place on greased baking sheet.
Bake at 350 F for 8-12 minutes.
*Makes 3 dozen cookies
Can't wait to share all our Christmas adventures with you! Hope you are having a beautiful holiday.

Sharing at these great parties:
Sweet Indulgences Sunday
Making Mondays Marvelous
Motivate Me Monday
Craft-O-Maniac

Wednesday, December 28, 2011

Best Potatoes

Hi friends! Hope you all had a very merry Christmas and are enjoying time with family and loved ones. The first annual Cookie Party was a success last night; we decorated 'til we dropped. Or maybe we dropped cause we ate so many cookies.

This recipe is really simple, so simple I almost feel silly posting it, but it is delicious. We've been experimenting a lot lately with baby yellow potatoes (they're just so darn cute!) and this is our favorite of all the different methods we've tried. They are crispy on the outside, soft and buttery on the inside. Sort of like a chip, kind of like a scalloped potato. Basically, heaven on a plate.

You will need:
12 baby yellow potatoes

1 c. olive oil
1/2 c. butter
1 tbsp. salt
1 tbsp. pepper

Directions:
Cut potatoes into slender slices. Melt butter and olive oil together in microwave; dip potatoes into mixture and spread out on baking sheet. Sprinkle with salt and pepper. Bake at 400 degrees for 25-30 minutes or until outside edges are turning brown and crispy.

Enjoy!

Thursday, December 22, 2011

Loaded Potato Casserole & Cookie Party Peek

Three more days!! We're almost there. It's a good thing, too, because I don't think my husband can take much more of the Michael Buble Christmas album blaring through the french doors of our office. Little does he know, that album's here to stay. There are still Silent Nights in July, you know.

I apologize for the crapiness of these pictures; they were taken in a rush with our old camera over Thanksgiving (yes, this post has been hiding, afraid to be shown for that long).Whatever you do, don't let the bad pictures deter you from whipping a yummy loaded potato casserole up over the holidays. It is so easy and so good. If you're looking for a last minute addition to your Christmas menu, this would be perfect! Found this recipe here on Plain Chicken.


Ingredients:
2 (16 oz.) containers sour cream

3 cups cheddar cheese, shredded
2 (3 oz.) bags real bacon bits
2 pkg. ranch dip mix
1 large (28-30 oz.) bag frozen shredded hash browns

Directions:
Combine first 4 ingredients, mix in hashbrowns (still frozen). Spread in a 9x7 in. pan. Bake at 400 for 45-60 minutes.
*I used two smaller pans (maybe 7x7??), one for Zach's family and one for mine

As you can see, it didn't last long at Thanksgiving.


And now for the fun stuff....I'm planning a cookie decorating/swap party! I ran around like a mad woman today singing Jingle Bells and popping Advil, trying to gather up all kinds of goodies. The best part? These tags my very talented husband made tonight (inspiration found here). The spatulas will be favors for all the lovely ladies who attend.
 I found these free printables here on Joy Ever After....aren't they the cutest?
We probably won't be back with a post until after the New Year, so we wish you all a very merry Christmas and all the joys of the holiday season. :)

Tuesday, December 20, 2011

Baked Mac 'n Cheese


It's still macaroni and cheese if you use baby bowties, right? Although, thinking about it now, baby bowties 'n cheese sounds pretty darn cute.

We are normally shells 'n cheese kind of people. You know, follow the instructions on the box and get 'er done quickly. However, when we found this recipe, we realized we could make an even better homemade version in just a little more time. Totally worth it. If you love cheese, bacon, and....cheese, this is most certainly the dish for you. It's creamy and filling...the perfect comfort food. It keeps well in the fridge too; we enjoyed our leftovers just as much as the first go-round. I plan on whipping some up again at Christmas for all the kids (and big kids!) in our family.


Ingredients:
1 pkg. (8 oz.) pasta of your choice (we used mini bowtie)
2-1/2 tbsp. butter, melted
1-3/4 c. milk
1/3 c. shredded cheddar cheese
1/2 c. real bacon bits

8 oz. Velveeta, cubed
2 tbsp. flour
1/8 tsp. pepper

1/2 tsp. salt

Directions:
Preheat oven to 400 degrees. Cook pasta as directed on package and drain. Melt 1-1/2 tbsp. butter in a heavy saucepan. Blend in flour, stir in milk slowly, and cook, stirring constantly, until mixture thickens (about 5 minutes). Add seasonings and cheese, stirring until cheese is melted. Add pasta and transfer to a buttered 1 qt. casserole or individual casseroles. Bake for 20 minutes. With 5 minutes left to go (after 15 minutes), sprinkle with shredded cheese and bacon bits.
Are you a mac 'n cheese lover too? What's your favorite comfort food?

Sharing at these great parties:
Tell me Tuesday
Totally Tasty Tuesdays
Creative Juice
Freestyle Friday
Do Something Crafty
While He Was Napping
Days of Chalk and Chocolate

Monday, December 19, 2011

Weekenders

This weekend was very busy around the Fullwood house. We cleaned, we cooked, we shopped, and we played. Playing still counts as being busy, right?


we Zach trimmed trees
we Zach cooked
we I played
We, yes actually 'we' this time, laughed and appreciated seeing (and hearing) the ice cream van in our neighborhood on December 17th.
We hit up estate sales and found treasures...
And last, but certainly not least, we built a yummy (though not very attractive) little gingerbread cottage. Don't judge us.

Hope you had a great, playful weekend as well! Less than a week until the big day! :)

Sunday, December 18, 2011

DIY Necklace Holder

Hi friends! Hope you've all had a wonderful weekend gearing up for Christmas and enjoying the holiday season. I want to share a simple project with you today that is quick (took us less than fifteen minutes!), inexpensive, and super practical. For a long time I've needed an effective way to display necklaces; especially since you only see above about 1/8 of the ones I own...the others are in a giant tangled wad. Even if you don't have a Moet chill box (we were given one as a gift and thought it was too pretty to throw out), any large cylinder shape should work for this. At one time I even contemplated using a fabric covered paper towel roll. The cork isn't necessary either, we just thought it added to the base.

We kind of made the rules as we went, and Zach amazed me with his craftiness, but I did my best to capture the simple steps for you. Went something like this:

We found a lamp base at Lowe's that was....wait for it....FREE! It's normally $5 but the packaging was opened a little and someone had written "no charge -Joe" on it in Sharpie. Gee thanks, Joe.
the capsule, waiting to be repurposed
Zach grabbed his drill and drilled a small hole all the way through the cork
We found a gold brass float rod in the plumbing section of Lowe's ($1.60) and using pliers, Zach twisted the rod all the way through the cork, with a little coming out the bottom
He pushed the rod through the hole in the lamp base...
and secured it on the bottom with a nut and washer
Then he measured the length of the capsule....
and drilled a hole, the same size as the one he put in the cork, in the center
 He twisted the rod into the capsule hole until it was nice and secure....
and viola! A masterpiece. Zach also took the cork wire and wrapped it around the top of the rod. Added the perfect touch. I'm a little biased, but I think it looks lovely and French-esque.

Saturday, December 17, 2011

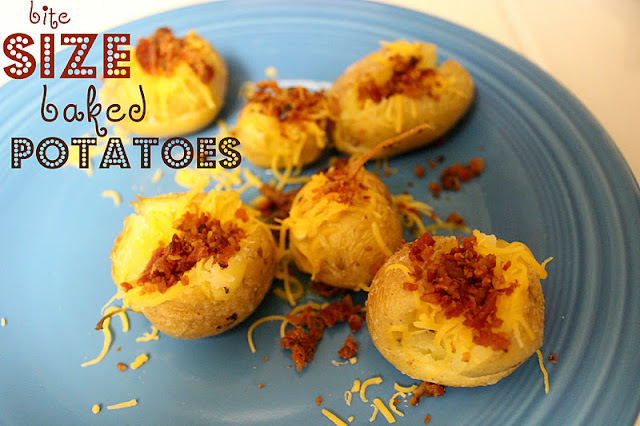
Bite-Size Baked Potatoes

Zach has a really charming love for all things teensy. It makes me smile. He even refers to me as Tiny. "Tiny, come watch this movie with me!" "Will you make me a sandwich please, Tiny?" "I love you, Tiny". I guess it's better than Large, right? No movies would be watched and definitely no sandwiches would be made.

Because of his tiny obsession, I wasn't surprised when he decided he wanted to make a bite-sized meal last night. Believe it or not, you can still get really full off bite-sized food. There's nothing that different about eating eight itty bitty potatoes rather than one normal size one. Except, BIG except, these are eight thousand times cuter. And more fun. And buttery. And melt-in-your-mouth-y. You don't even need a fork, really. Just pick 'er up, pop her in your mouth, close your eyes and enjoy the moment. Kind of like the Dove Chocolate commercials. My moment, my potato. You know the drill.

My chef-of-a-husband made this up as he went, and they turned out perfectly. I wouldn't change a thing about them. Luckily for you guys I stalked his every move just to share with all of you. I got salt in my eyes, was almost tripped over four different times, and somehow ended up with butter, a lot of butter, in my hair. You're welcome.

What you'll need:
12 baby yellow potatoes
2 tablespoons butter

1 cup olive oil
1 tablespoon salt
1/2 cup shredded cheddar cheese
1/4 cup bacon bits

Directions:
Preheat oven to 400. In a microwave safe bowl, melt butter and olive oil. Wash potatoes in sink and roll 2 or 3 at a time in butter/oil mixture. Place potatoes on a cookie sheet (with an edge! this is critical. if no edge, the oil will run off and explode your oven. okay maybe not, but there's always that small chance we'd like to avoid). Once all potatoes have received a bath, pour remaining butter/oil mixture over potatoes on cookie sheet. Sprinkle with salt. Bake for 30-40 minutes or until a fork goes in easily and potatoes are soft. Remove from oven, slice open with a fork, and fill with butter, cheese, and bacon bits. Add sour cream and chives too if you'd like. Enjoy!


Sharing at these great parties:
Sweet Indulgences Sunday
Totally Tasty Tuesdays
Days of Chalk and Chocolate

Thursday, December 15, 2011

Butterfinger Cookies

There's no denying it...I've been baking entirely too much lately. But, in my Betty-Crocker-wanna-be defense, is that even possible during the holiday season? There never seems to be a shortage of parties, dinners, or hungry husbands. Can I get an Amen?

Even though I pat myself on the back and thought I was the genius who first thought of this combination (much like these), I googled "butterfinger cookies" and felt like Christopher Columbus when he realized he wasn't actually the first to discover the New World. However, my discovery or not, these are amazing. You will want to head to the nearest grocery store, grab some butterfingers, and get that kitchen crankin', ladies. These cookies are chewy, crunchy, and have the perfect amount of chocolate. Oh, they are good. Not New World good, but close.

In a medium-size mixing bowl, beat eggs with a fork until the whites and yolks are well blended.
 Add the vegetable oil and vanilla, stirring until blended with the eggs.
Blend in sugar.
Sift together the flour, baking powder and salt. Add these dry ingredients, a small portion at a time, to the above mixture, mixing until all ingredients are moist and batter is smooth.
 Unwrap Butterfingers and seal in a Ziploc bag. Using a rolling pin, crush candy until it's in very small chunks.
Stir Butterfingers into mixture.
Drop batter by teaspoon, about 2 inches apart, onto an ungreased cookie sheet.  Bake at 400 degrees for approximately 8 to 10 minutes.
Ingredients:
2 eggs

2/3 c. vegetable oil
2 tsp. vanilla
3/4 c. granulated sugar
2 c. all-purpose flour
2 tsp. baking powder
1/2 tsp. salt
1 pkg. fun size Butterfingers
 
Directions:
In a medium-size mixing bowl, beat eggs with a fork until the whites and yolks are well blended. Add the vegetable oil and vanilla, stirring until blended with the eggs. Blend in the sugar. Sift together the flour, baking powder and salt. Add these dry ingredients, a small portion at a time, to the above mixture, mixing until all ingredients are moist and batter is smooth. Unwrap Butterfingers and seal in a Ziploc bag. Using a rolling pin, crush candy until it's in very small chunks. Stir Butterfingers into mixture. Drop batter by teaspoon, about 2 inches apart, onto an ungreased cookie sheet. Bake at 400 degrees for approximately 8 to 10 minutes. Allow cookies to cool on the cookie sheet for 2 or 3 minutes before removing to a cake rack to complete cooling.
*makes 3 dozen cookies


Linking up at these great parties:
The Answer Is Chocolate
Flaunt It Friday